Essential features
By the end of this chapter
- use the chatter and the activities to follow a case;
- write formatted content in the editor;
- add a piece of information to a record without development;
This chapter brings together Odoo's cross-cutting mechanisms: the chatter, activities, the content editor and property fields. They work identically in every application. Data exchanges, which follow the same cross-cutting logic, are the subject of chapter 22.
The chatter
Every document (contact, quotation, invoice, task, manufacturing order) carries a discussion thread that gathers the history of exchanges and changes.
Writing a note or a message
- Open the document.
- At the bottom of the form, choose the writing mode: - Log note: visible to internal users only; - Send message: sent to the document's followers, including external ones.
- Write the text, attach files if necessary.
- Send.
Watch out
The distinction between a note and a message is not cosmetic: a message really does go out to the customer following the document. Before writing an internal comment on a sensitive case, check that the Log note mode is indeed selected.
Managing followers
The followers icon, at the top of the thread, displays the list of the people who are notified. You can add people, remove them, and restrict the types of notification each of them receives.
Mentioning a colleague or a role
Type @ followed by a user's name in a message or a note: that person receives a
notification.
The list offered after @ also carries the roles defined for your organisation.
Mentioning a role notifies every user attached to it; beyond fifty recipients, Odoo asks for
confirmation before sending.
Note
Mentioning someone does not make them a follower of the document. For a person to follow the rest of the exchanges, they must be added explicitly to the followers.
Activities
An activity is an action to be carried out, with a date and an assignee. It is Odoo's internal follow-up mechanism.
Scheduling an activity
- Open the document concerned.
- In the chatter, click Activity.
- Choose the type from the badges offered: call, meeting, email, to-do, document, or any type defined for your organisation.
- Summarise the action expected in the Summary field.
- Fill in the deadline in the Due on field.
- Name the owner in Assigned To, or a Role when the activity falls to a group of people rather than to someone in particular.
- Click Save.
Note
The fields of this window carry no label: each one is identified by its icon and by the text shown as a placeholder.
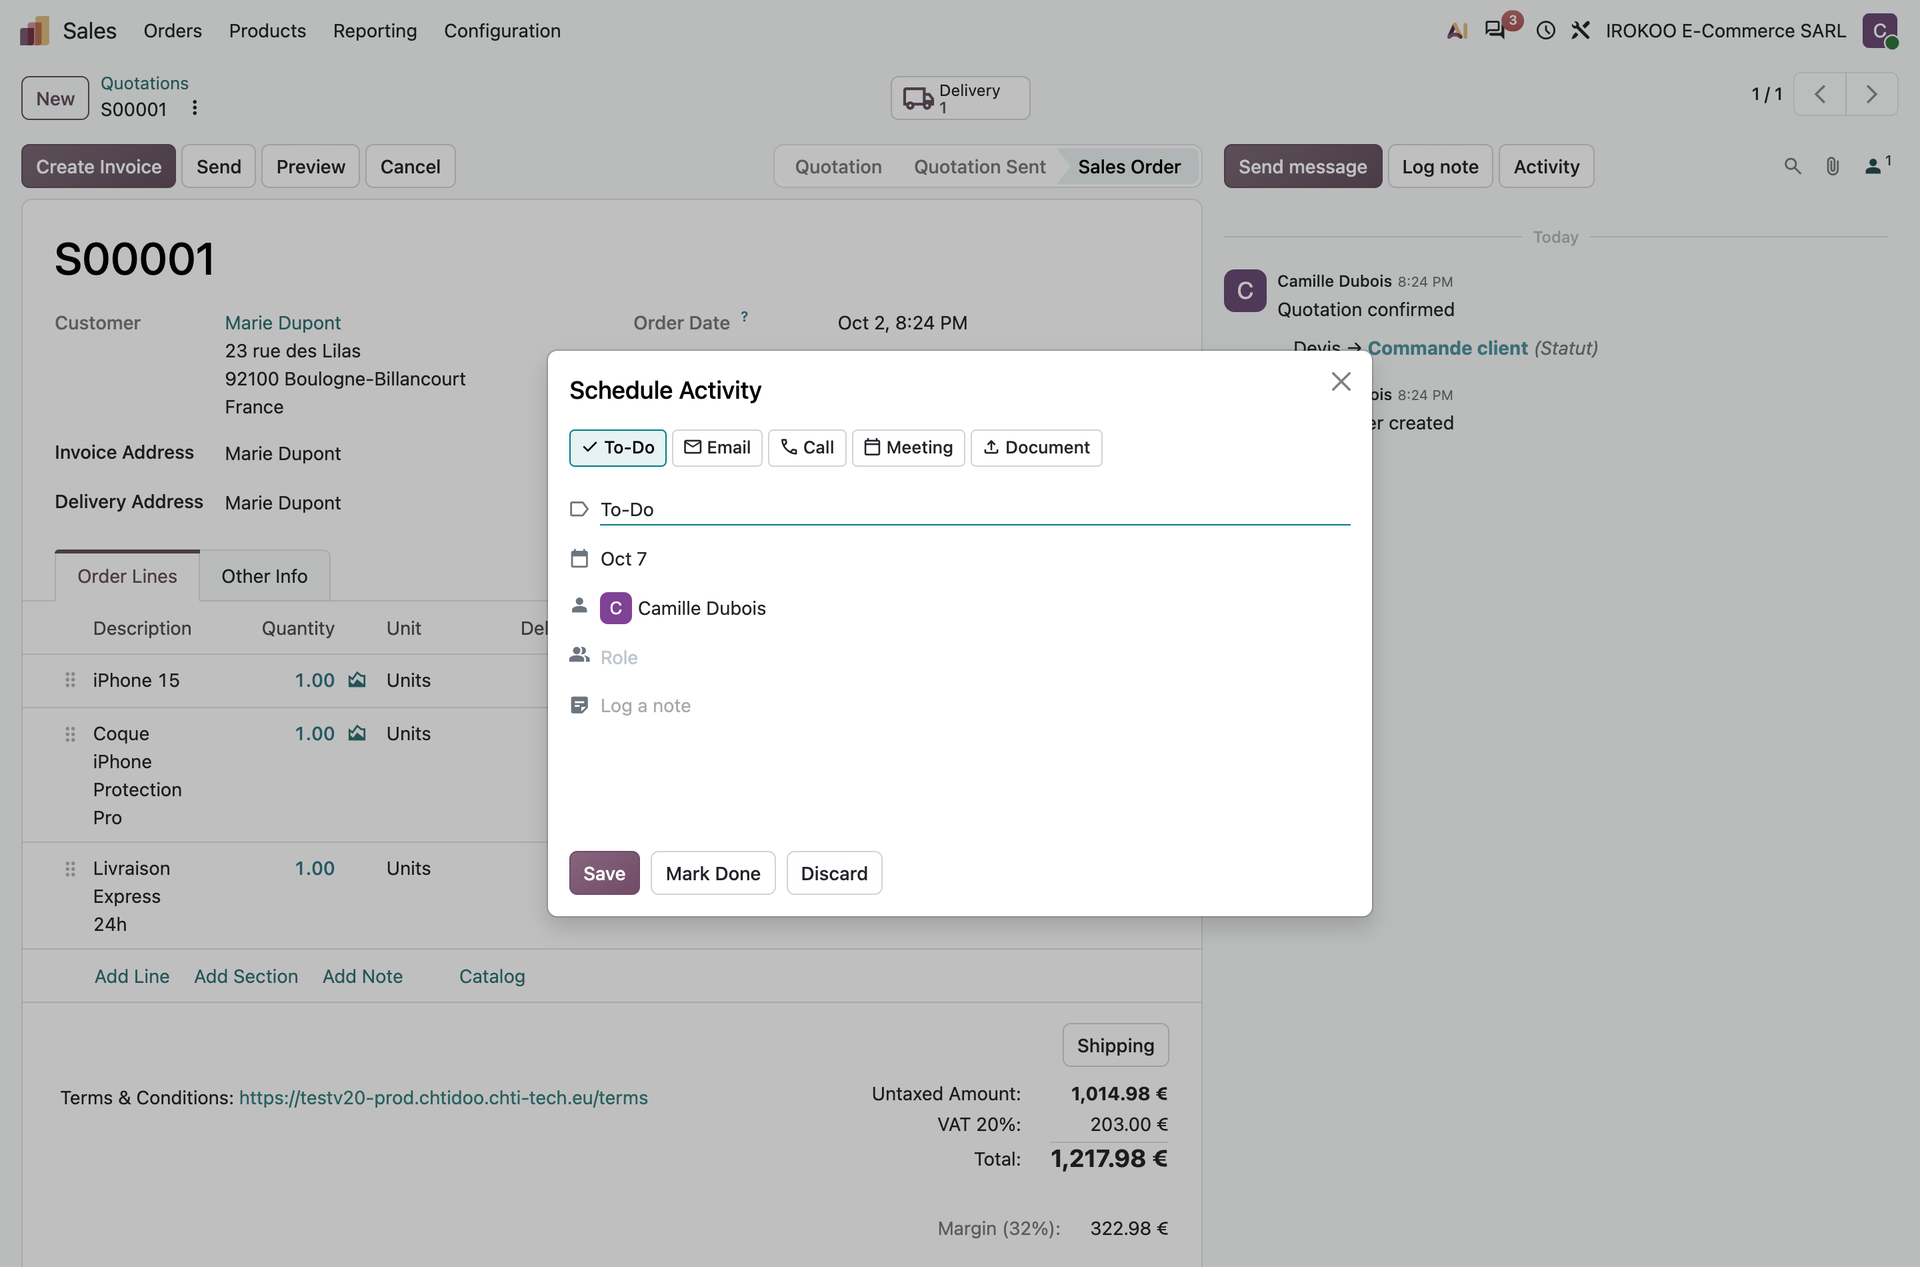
Following your activities
The clock icon in the top bar brings together all your activities, sorted into overdue, today and upcoming. They are grouped there by application; a click opens the filtered list of the records concerned, not the document itself.
When activities have been handed to a role you belong to without being assigned to anyone yet, an extra entry at the bottom of this menu counts them and opens their list. Writing your name in the Assigned To column is enough to take one over.
In the applications that offer it, the Activity view presents the records in columns by activity type, which gives an immediate reading of the workload ahead.
Tip
Activities are of no use if they are not closed. Get into the habit of clicking Mark Done and moving straight on to the next one: it is that gesture, and not the initial scheduling, that makes the follow-up reliable.
The content editor
The rich editor is used everywhere formatted text is expected: descriptions, emails, notes, articles, terms and conditions.
Formatting
Selecting text brings up a toolbar: bold, italic, underline, colour, list, link, alignment.
Typing / at the start of a line opens a menu for inserting a block: heading, table,
image, separator, quote, callout, button.
Tip
Ctrl + K (Cmd + K on a Mac) inserts a link on the
selected text without leaving the keyboard.
Writing or rewriting with the assistant
The assistant is called from the editor, in both directions: producing a text, or reworking an existing one.
To produce a text from nothing:
- Place the cursor where you want it.
- Type
/to open the insertion menu, then choose AI in the AI Tools category. - Describe the text expected, then insert the proposal.
To rework a passage: shorten, lengthen, change the tone, correct, translate:
- Select the text concerned.
- Choose the assistance action in the toolbar, which appears with the selection.
- State the transformation expected.
- Compare the proposal with the original text, then accept or reject it.
Note
This feature belongs to the Enterprise edition and consumes in-app purchase credits (see section 3.3.4). The proposal replaces the selected text: read it again before accepting, particularly on contractual documents.
Property fields
A property field adds a piece of information to a record without changing the data model or resorting to development. It is defined at the level of a parent record and applies to its children: for example a field added on a project and available on all its tasks.
- Open the record.
- Click the button for adding properties, located below the standard fields.
- Name the field and choose its type: text, number, date, selection, relation, tags, checkbox, signature.
- Save.
The field becomes available on the linked records, and usable as a filter and grouping criterion.
Note
Property fields suit information specific to a context: a characteristic followed on a single project, a detail asked for by a single customer. For information useful across the whole database, a field created with Studio is more appropriate (see chapter 23).
Searching for a contact
Contacts are the most heavily used data in the database.
- Open the Contacts application.
- Type a fragment of a name, a company, an email address, a phone number or a tag in the search bar.
- Choose the field the search should bear on from the list offered.
The groupings offered, by Salesperson, by Company or by Country, quickly give a usable segmentation.
Tracking changes
On sensitive documents, the history of value changes is recorded in the chatter: who changed what, when, and what the previous value was.
Note
This tracking only covers the fields declared as tracked, and the scope varies from one application to another. On a sales order, the total and the salesperson are tracked; on an invoice, neither the total nor the due date is. If you are in doubt about a specific field, the only way to know is to change it and see whether the chatter records it.