Advanced CRM
By the end of this chapter
- distribute deals automatically between teams and salespeople;
- feed the pipeline through enrichment and prospecting;
- adapt sales follow-up to your own qualification criteria;
- build the analyses that actually steer the business.
Day-to-day use of the CRM is covered in chapter 7. This chapter deals with the settings that automate the distribution of work, feed the pipeline and refine the analysis. They are aimed at the sales manager and at the database administrator.
Distributing deals automatically
Rather than assigning each lead by hand, Odoo can route it to the right team and then to the right salesperson, according to written rules.
Enabling the mechanism
Automatic assignment is first set at app level, once and for all.
- Open CRM › Configuration › Settings.
- Tick Rule-Based Assignment.
- Choose how it is triggered: - Manually: assignment only runs on request, through a button on the team record; - Repeatedly: a scheduled job re-runs it at regular intervals, set by Repeat every. The date of the next pass appears next to Next Execution, and can be corrected if needed.
- Save.
Tip
Start with Manually. You test your rules by triggering assignment whenever you want, and you see the result before it happens again on its own. Switching to automatic comes once the domains have settled.
Routing leads to the right team
- Open CRM › Configuration › Sales Teams and select the team.
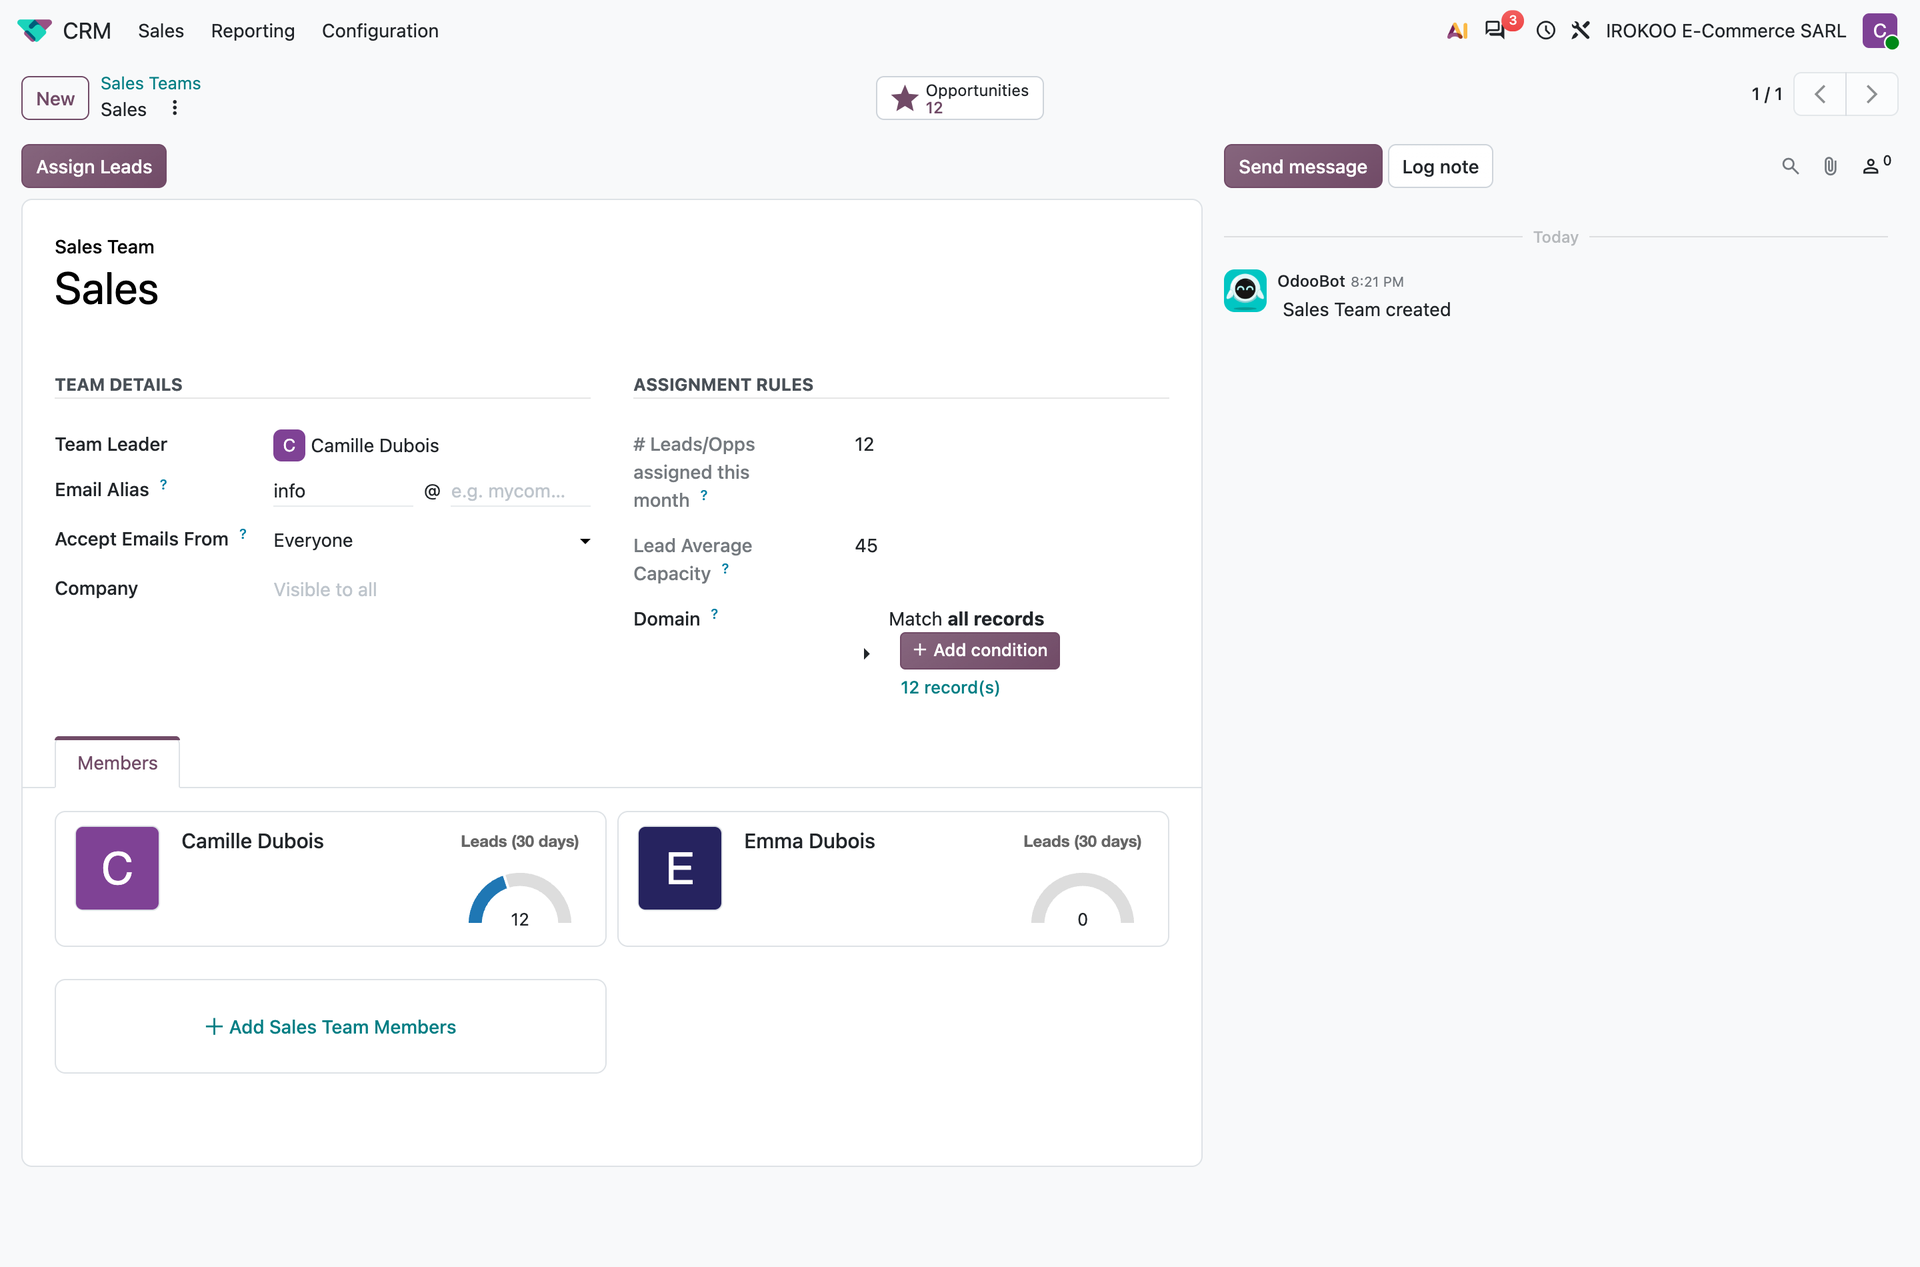
- In the Assignment Rules block, expand the Domain field.
- Click New Rule and build the criteria a lead must meet to be assigned to that team: country, industry, source, expected revenue, tags.
- Save.
Tip
The counter shown next to the domain (n record(s)) indicates how many leads match at that moment. It updates with every change: use it to test your criteria before saving, rather than discovering the result afterwards.
The same block reminds you where the team stands: one field carries the number of leads and opportunities assigned this month, and Lead Average Capacity the team's ceiling, which is the sum of the capacities of its members. A warning icon appears in front of the running total as soon as it exceeds that ceiling.
Triggering the assignment is done with the Assign Leads button, at the top of the team record. Odoo asks for confirmation, then distributes leads between the members according to their capacities and their own domains.
Note
This button only appears if rule-based assignment is active and if the team handles leads or opportunities. It remains available even in Repeatedly mode, which lets you re-run the assignment without waiting for the next scheduled pass.
Note
The Pause auto assignment checkbox takes the team out of the mechanism without erasing its domain. That is the setting to use to suspend a team temporarily (holidays, reorganisation) rather than clearing its criteria. It only appears in Repeatedly mode, since manual mode has nothing to suspend.
Distributing between salespeople
- From the same team, open the Members tab.
- Open the record of each salesperson, Lead Assignment tab.
- In Auto-Assignment Rules, keep the case that matches them: - Always in rotation: they receive leads with no ceiling; - In rotation, with a limit: a number to type caps what will be assigned to them, over a rolling thirty days. The running total already assigned appears beside it; - Out of rotation: they receive nothing any more.
- If their scope is narrower than the team's, build their own domain in Only assign if. The Give priority if domain restricts nothing: it makes the leads that answer it be handled first.
- Save.
Each member then appears on a card carrying a Leads (30 days) gauge, which shows their workload against their ceiling at a glance.
Note
The ceiling is understood over a rolling thirty days, not per run. A salesperson set to thirty leads will not receive thirty on every pass of the scheduled job, but thirty in total over the month.
Tip
Out of rotation removes a salesperson from the distribution without taking them out of the team: their open deals stay with them, they simply stop receiving anything new. That is the right move for an absence. Both domains disappear from the form while that choice is active.
Examples of rules
- Leads from the industrial sector to the key accounts team.
- Leads located in northern France to the salesperson for that region.
- Leads coming from the website form to the team in charge of the web.
- Leads whose expected revenue exceeds a threshold to the sales manager.
Watch out
The domains of the different teams must not overlap. Two rules that overlap assign the lead to the first team evaluated, which produces assignments that are hard to explain to the salespeople concerned.
Feeding the pipeline
The pipeline carries a Generate button which gathers the ways of bringing deals into it: Lead Sourcing to draw on Odoo's company directory, Website for an online form, Email Marketing to collect the replies to a campaign, Survey to qualify through a questionnaire, Mail Plugins to create a lead from Outlook or Gmail, and Import leads from a CSV for a file.
Note
The entries matching an application that is not installed offer to install it. A user who is not allowed to do so triggers instead a request addressed to the administrator.
Enriching records automatically
From the domain of the professional email address, Odoo completes the record: company name, postal address, industry, headcount, logo.
- Open CRM › Configuration › Settings.
- Enable Lead Enrichment.
- Choose the trigger: automatic on every new lead, or manual.
- Save.
In manual mode, open a lead and click Enrich.
Prospecting for new contacts
- Open CRM › Configuration › Settings and enable Lead Mining.
- Open CRM › Sales › My Pipeline, click Generate then Lead Sourcing.
- In the Lead Mining Request, state the number of leads wanted, then the search criteria: Countries, Sectors of Activity and, if useful, a headcount range.
- Choose whether to obtain companies alone or companies with their contacts.
- Fill in the team, the salesperson and the tags to apply to the leads created.
- Click Generate Leads.
Note
Enrichment and prospecting consume service credits. When the balance runs out, Odoo says so at the moment of the action and offers to acquire more.
Scoring leads automatically
Predictive scoring computes a probability of success from past deals, comparing the characteristics of the lead (country, industry, source, tags, language) with those of won and lost deals.
It is always on: there is nothing to tick. The Predictive Lead Scoring block in the settings merely displays the criteria used and the start date of the history.
Adjusting the computation.
- Open CRM › Configuration › Settings.
- In the Predictive Lead Scoring block, click Update Probabilities.
- Add or remove the fields to be taken into account: State, Country, Phone Quality, Email Quality, Source, Language, Tags.
- Set the date in Consider leads created as of the.
- Click Update.
The computed probability feeds the Probability field of every opportunity, and therefore the forecasts.
Note
Stage is always part of the computation and cannot be removed from it: it is the foundation of the scoring. The other fields refine it. Removing a criterion that makes no sense in your business (language, if you only work in France) makes the model sharper.
Note
The button re-runs the computation over all of the history considered. It only rewrites the probability of opportunities that were still following the automatic value: a probability entered by hand is left as it is.
Watch out
Scoring requires a history that is both long enough and, above all, properly filled in. If lost reasons have never been entered, the model learns from incomplete data and produces misleading probabilities. One year of properly kept history is a reasonable minimum.
Note
Entering a probability by hand on an opportunity switches off the automatic computation for that deal. The salesperson therefore keeps control over what they know better than the model.
Customising the follow-up
Adding fields
Some qualification information is specific to your business: available budget, decision deadline, competitor in the running, product of interest.
- Open an opportunity.
- Click the Studio icon in the top bar (see chapter 23).
- Drag the field type you want to the place you want it.
- Name the field and set its properties.
- Save and leave Studio.
The field then becomes available as a filter criterion, a grouping criterion and an assignment rule criterion.
Note
Without Studio, a property field meets the same need in a lighter way (see section 4.4).
Email templates
- Write a message from an opportunity and get it right.
- Before sending, save the content as a template from the options of the composer window.
- The template is then offered on every send from an opportunity.
Templates accept dynamic fields (contact name, company, deal amount, salesperson) replaced automatically when the message is sent.
Automating follow-ups
The general mechanism of automated actions is described in chapter 21. Applied to the CRM, it lets you, among other things:
- create a follow-up activity three days after a quotation is sent;
- notify the manager when a high-stakes deal has had no activity for a week;
- send an introductory email to newly qualified leads;
- raise an alert when an opportunity goes past its expected closing date.
Tip
Automation should lighten the salespeople's work, not replace it. Automate reminders and repetitive tasks; keep human contact for the steps that decide the deal.
Analysing in depth
Won / lost analysis
- Open CRM › Reporting › Pipeline.
- Filter on the deals closed during the period.
- Group by lost reason, then by salesperson or by source.
This reading answers three distinct questions: are we losing on price, on lead time or on scope? Are we losing more on certain sources of business? Are we losing at a specific stage of the cycle?
Steering indicators
| Indicator | What it tells you |
|---|---|
| Conversion rate by stage | Pinpoints the stage where deals stall. |
| Average cycle duration | Measures the time between creation and closing. |
| Average deal value | Directs sales effort towards the profitable segments. |
| Number of activities per salesperson | Distinguishes a thin pipeline from a lack of activity. |
| Breakdown of lost reasons | Feeds pricing and product decisions. |
Saved reports
An analysis you have got right can be kept in Favorites and shared with the team. A weekly sales meeting is better served by two or three stable reports, consulted at every session, than by analyses rebuilt from scratch each time.
Connecting the CRM to the other apps
- Sales: the quotation created from the opportunity keeps the link with the deal it came from.
- Project: a won deal can give rise to the creation of an implementation project.
- Calendar: meetings scheduled from an opportunity feed the agenda.
- Email: messages received at the team address create or feed leads.
- Accounting: the customer's outstanding balance and payment delays can be consulted from their record.
Good practice
Configure without over-complicating
- Write down the sales process before configuring the pipeline, not the other way round.
- Stick to five or six stages, using tags to distinguish cases if need be.
- Standardise the information expected at each stage, and ask only for what is actually used.
- Train the teams on the basic moves rather than on the full range of features.
- Periodically clear dormant deals out of the pipeline: they distort every indicator.